Using VNC Via An Ad Hoc Wifi Network

VNC (in various forms eg RealVNC) is a multi-platform app used to control one computer via another over a network. This could be a home LAN or over the internet from anywhere in the world. The virtual screen of the remote computer (the ‘Server’) appears on the actual screen of the users computer (the ‘Viewer’) allowing the remote user to manipulate the remote computer as if they were sitting in front of it.
This is useful for a host of possible reasons; in my case, I want to be able (amongst many other things) to control a Windows XP PC in my garage running an app that conditions rechargeable batteries without having to run out to the garage every few hours to start a new charge cycle. The charger is connected to a Windows PC in the garage and so in this example the garage PC is the Server. Users of VNC will be familiar with using the infrastructure type of wifi network. I will not bother describing how to configure VNC etc here.
This page describes the more unusual means of connecting two computers directly, without a router and/or modem in-between, ie an ‘ad hoc’ or ‘peer to peer’ connection. Obviously the workable distance between the two computers is dependant on the power of the radio in each adaptor, normally only 10m or so, maximum.
So, the Server PC must be running Windows XP for what follows to make sense. The viewer can be anything, including an iPhone, for example, for which you can get a VNC app. In my case, I want to have the built in wifi adaptor in the Server computer to always be used whilst at home via my home LAN. Then whilst away from home, I want to use a separate USB wifi adaptor for the ad hoc connection. This means that I can configure VNC to use both networks nearly independently of each other and not have to worry about fiddling with the VNC settings at either end each time I use it.
The very abridged version...
The main issue to understand is that some wifi adaptors, especially USB ones, can not have a user selected fixed IP address with the same first 9 numbers (whatever that is called - a ‘domain’?) in ad hoc mode. Fixing the Server IP address is one of the first things to do when using a complex VNC setup as it is much easier to keep tabs on all the different computer IDs rather than let Windows loose with it all. So, create a new network for the adaptor which will only be used for the ad hoc, away from home VNC connections and five it a very different IP address from those of your existing LAN.
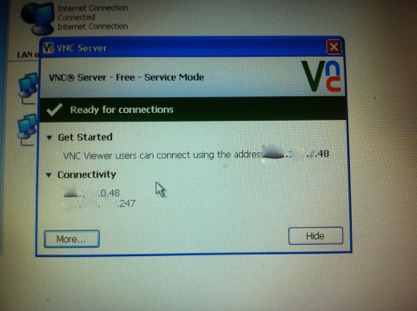
Then all you have to do is create a new VNC entry on the Viewer device with identical IP address and subnet mask (not forgetting VNC security if any is set) to the ad hoc adaptors ones and you should find your VNC client will connect fine and shows something like this...
‘Connectivity’ shows both the infrastructure and ad hoc connections with their respective IP addresses. Which one will work will depend on which wifi network the viewer device is currently connected to.
The very LONG version...
On the Server computer, install the USB wifi adaptor (UWA). Ideally, just install the drivers as the configuration programme that often comes with these things is big and not needed. Windows can deal with it on its own.
Once installed, ensure the adaptor is set to ‘Ad Hoc’ mode rather than ‘Infrastructure’. This will vary from one adaptor to another but normally you will find a setting in the Adaptor’s Device Manager properties like this... Click on ‘Start’, right-click on ‘My Computer’, ‘Properties’, ‘Hardware’, Device manager...
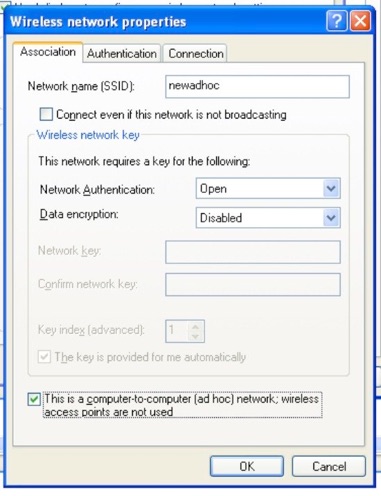
... and give your ad hoc network a suitable name, eg NewAdHoc, leave ‘Connect Even if...’ un-ticked, ensure Network Authentication is Open, Data encryption as you wish (but if you choose something I have only tried WEP and you will have to pick a suitable key) and most important, tick the ‘This is a computer-to-computer....’ tick box.
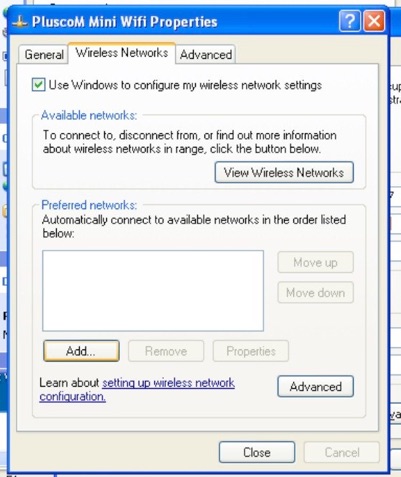
Click on the Wireless Networks tab..
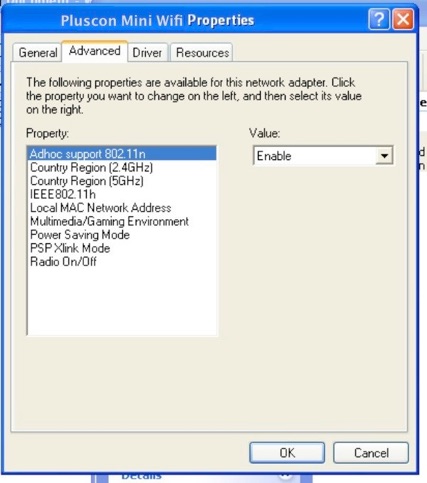
This opens a window titled ‘(adaptor name) Properties’. Click on the ‘Advanced’ tab and as you can see, this one has an option called ‘Adhoc support’. Enable it.
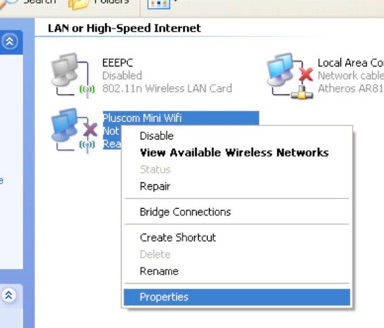
... and right-click on the relevant adaptor (the Pluscom one in my case) and click on Properties’. If it isn’t there, it has not been installed correctly.
On with the main business...
Open Network Connections (Start, Connect To, Show All connections) ...

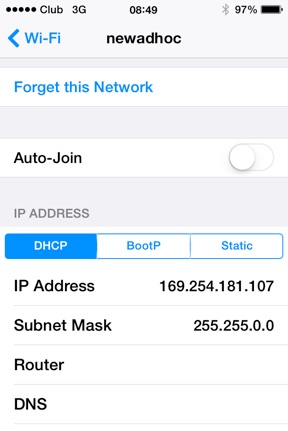
Next, fire up your iPhone and go to ‘Settings’ and try to connect with the NewAdHoc network (obviously you will need to be within range which means a few metres)...
Having connected, after a minute or so, if you tap on ‘i’ or ‘>’, depending on your iOS, you will see the IP address etc that the adaptor has given itself. Note that the IP address (and subnet mask) are completely different to those of your own LAN. This is the key to getting the adaptor to work with VNC in ad hoc mode. If you try to get it to work on your existing LAN IP address range (first 9 numbers the same) it will never allow VNC to work. VNC Viewer will ask for the Server VNC password (if any) but aside from that all you will get is a blank screen and ‘Connecting...’ until it times out.
Click on ‘OK’ and again on the other open properties window.
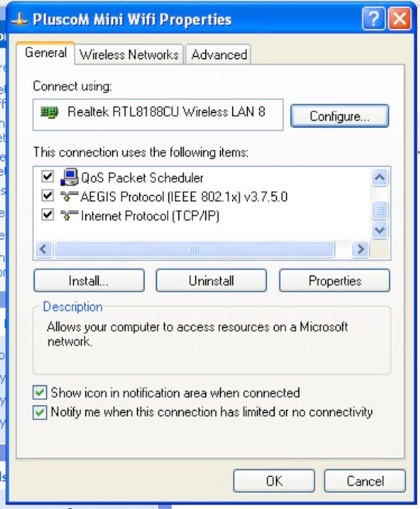
So, next thing to do is give the ad hoc adaptor a fixed IP address. Open the ad hoc adaptor properties again (Open Network Connections (Start, Connect To, Show All connections and right-click on the UWA and click on ‘Properties’) and ‘General’ tab. Scroll the list of items under ‘This connection uses...’ to the bottom where you will find ‘Internet Protocol (TCP/IP)’. Click on it and then click on ‘Properties’.
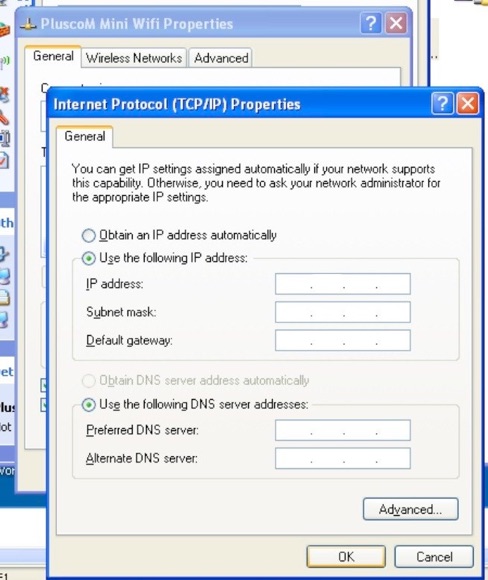
Click on ‘Use the following IP address;” and enter what ever you want as long as all of the entries are between 0 and 255 and the first 9 are dissimilar to your LAN’s. When you click on the subnet mask it will populate automatically. You can change this or leave as is. Leave the other boxes empty and click ‘OK’.
Next, click on the ‘Authentication tab and make sure it looks like this...
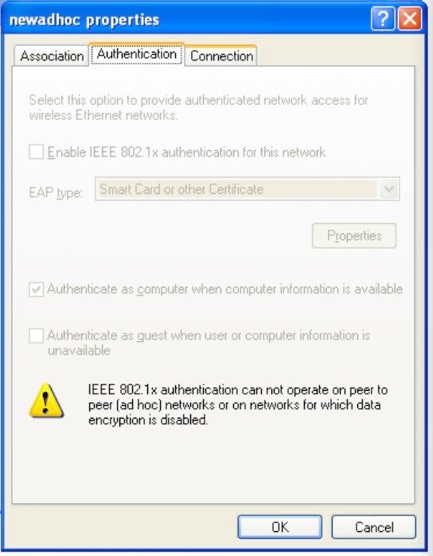
You can leave the ‘Connection’ tab alone.
Click on ‘OK’ and then configure the VNC server settings to match the ad hoc adaptors fixed IP address. When you connect your iPhone to the ad hoc network you should now find it now works.

