Bibo Water Heater Leak

The Bibo is a self-contained water heater and cooler. It costs around £440. It is plumbed directly from the water mains and uses 240VAC for power. It (arguably) saves money on kettle use and also has a 2-stage water filtration system consisting of the usual canister type filter as well as an ultraviolet anti-biotic sterilizing stage. Both filter devices are replaceable at a recommended annual cost of £70 or so. The UV filter is still fine in ours after 2 years and the cartridge gets replaced once a year for the 2 of us. I suspect it would last a lot longer...
Aside from getting bunged up with limescale (we are somewhere around the middle of water hardness for the UK here in E Herts) - and there is a cleaning kit for that available from Bibo for about £33 - ours started leaking from its innards after about 2 years. We thought it was due to the limescale issue and initially this was causing the drip tray to overflow as well. On using the limescale cleaning kit, we found that the drip tray was dry as a bone but water was still emerging from underneath.
As the unit was well out of warranty I decided to have a go - as one does - at doing a DIY leak repair. In fact it was a very easy repair. It transpired that there is a pressure reducing valve (PRV) immediately after the water inlet inside the ‘box’ that was leaking from a seal.
I would suggest you read all this through carefully before commencing.

Repairing the leak will take about an hour - assuming you already have a replacement PRV. You can get an official one from Bibo (customers@bibowater.co.uk) for about £20 inc carriage or you can buy one of these... http://www.ebay.co.uk/itm/181363851299?_trksid=p2060778.m2749.l2649&ssPageName=STRK%3AMEBIDX%3AIT for £15 inclusive.
You will need:- A No 2 phillips screw driver, a small (3-4mm) flat-bladed screwdriver, a small (ideally 6”) adjustable spanner and a replacement PRV.
If your Bibo needs descaling, descale it before proceeding.
(If you are using a non-official PRV you must measure the pre-repaired Bibo water flow rate to get the PRV pressure reasonably correctly set, once installed. If you are using the official PRV then you can skip this.
So, measure the flow rate of the Bibo’s cold tap by timing a specific amount of water flow into a suitable receptacle eg 500ml in 24 seconds eg in my case).
1. Isolate the water supply to the Bibo and drain what water will come out from the system by opening either the hot or cold tap. This takes the pressure out of the internal piping. If you want to first check that your leak has the same cause as mine before commencing the repair, leave the water connected but off during disassembly. Once the PRV is revealed you can turn the water on and see if you have the same leak as I had.
-
2.Switch off the Heater switch and the Power switch at the back of the unit ... see below.
-
3.Unplug the Bibo from the mains.
3a. Disconnect the water supply - this may not be necessary depending on how much room you have to maneuver. All the water fittings on the Bibo use 1/4” (6mm) ‘push-fit’ plastic fittings.
-
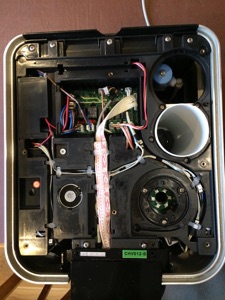
4. Remove the lid of the Bibo by gently lifting it from the centre-rear.
-
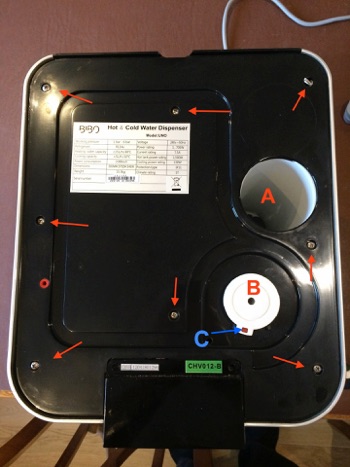
5.Unscrew the 8 screws from the top of the unit indicated (left) by red arrows.
-
6.Remove the filter cartridge.
-
7.Remove the UV filter by depressing the little red tab indicated with ‘C’ with a small flat-bladed screwdriver and - at the same time - rotating the UV filter head B in an AC/wise direction. Carefully pull it out straight up. NOTE! do not lean it over in the mounting until it is clear of the mounting hole or you could break it!
-
8.Remove the top plastic cover. This releases the top edge of the side panel.
-
9.Unscrew the 2 screws indicated with red arrows on the right side (as you look at the front).
-
10. There is one last screw on the front of the unit to undo before the side panel will come off. I have not got a picture of it but it will be revealed (and obvious) when the drip tray is removed and is somewhat smaller than all the others.
-
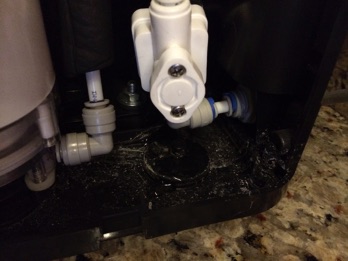
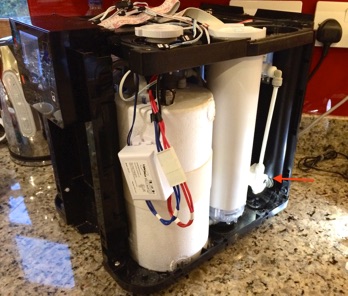
11.This photo shows the side panel removed and the faulty, leaking PRV indicated by the red arrow.
12. A close up of the old PRV in situ.
-
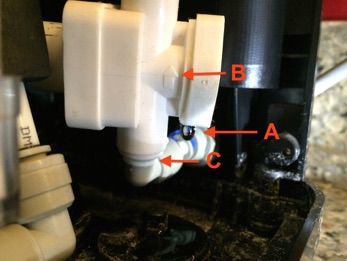
13. ‘A’ indicates the leak (you can see a drip is forming) but this was taken with water supply attached and on (see section 1.)
-
14.‘B’ indicates the PRV direction of water flow arrow. Getting the replacement PRV installed with the same orientation of water flow is CRUCIAL. Get it wrong and no water will flow!
-
15.Disconnect the old PRV by pushing the collar indicated by arrow ‘C’ in towards the body of the valve and then, with the collar held in, gently but firmly tug the male part of the connection away from the collar. It is sometimes easier to push the male part and collar at the same time, then hold the collar in and tug male part out. If you find this difficult, use the adjustable spanner or similar to push the collar in.
-
16.Do the same with the other side of the PRV and discard it.
-
17.Consider how the PRV will sit inside the unit - there is a fair amount of room but you will have to snap off the 2 mounting lugs first. Again a pair of pliers will do this easily.
-
18.Connect the new PRV (checking orientation of water flow) by just pushing the 1/4” pipes into the sockets on the new PRV. You may see that a black line has been marked on the ends of the male parts/pipes. It is essential that on inserting the male parts/pipes into the new PRV that these lines align with the edge of the collar indicating that they are fully seated (there may be a mm discrepancy either way according to the design of the new PRV). Test that the male parts/pipes are properly inserted by tugging gently but firmly on them BEFORE reapplying water pressure or there may be a ‘messy water event’ as the joint fails. A guide to how much force to use to test the connection would be similar to lifting about 3 to 4kg (ie 3-4 litres of water) of weight. Any more and you may irrevocably damage the connection.
-
19.Pull the PRV’s cap up 6 mm or so which allows you to turn the knob to adjust the valve reducing pressure (ie flow rate).
-
20.Ideally apply water supply at this point and purge any air in the pipes by draining some water through the taps by switching on the Power switch (Heater is not needed yet) and activating the cold tap for a second or two. Leave the unit for a while to see if there are any leaks.
-
21.Adjust the flow rate to roughly match the timed filling of your receptacle as in section 1. Don’t be tempted to speed up the flow as the extra static pressure (ie when the hot & cold taps are off) may damage internal parts.
-
22.If all is good, reassemble the unit.
-
23.Apply water and power and switch on both Heater and Power switches. End of.
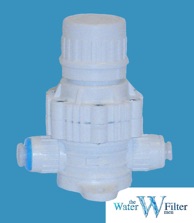
Alternative PRV off eBay